It is really hard to create PDF from program such as VB, C, Foxpro or any programming language. Most people use Crystal Report or create a Word document then use the PDF printer to print it as a PDF. After the research I did, I can manage to create PDF from a Postscript file. Basically the postscript file is a text file, so you can use any programming language to generate it. Then use the Adobe distiller to convert the .ps file to .pdf. Let me show you the sample file.
%% Postscript file header
%!PS-Adobe-3.0
%% Font Encoding for French accent
/Courier
<< /Courier findfont () forall >>
begin
/Encoding ISOLatin1Encoding 256 array copy def currentdict
end
definefont pop
%% Change the font to 8 points Univers, move to X:40, Y:20 and display Hello World
/Univers 8 selectfont
40 20 moveto
(Hello World) show
%% Change to 10 points Courier and display back slash and brackets
/Courier 10 selectfont
40 50 moveto
(this is a back slash : \\) show
40 70 moveto
(these are brackets : \(\)) show
%% Change the width and height scale and display the text
gsave
/Univers 10 selectfont 1.6 0.9 scale
40 90 moveto
(This is a test) show
grestore
%% Set Univers Bold font
/Univers-Bold 10 selectfont
%% Line, Box, EPS and Colour settings
%% Change to black colour, set the line width
0 setgray
0.2 setlinewidth
%% Draw a line
35 678 moveto
600 678 lineto
stroke
%% Drawing a box
0.7 setgray
0 setlinewidth
newpath
160 756 moveto
540 756 lineto
540 770 lineto
160 770 lineto
closepath
fill
%% Draw a EPS polygon
0.5 0.2 0.56 setrgbcolor
newpath
16 69 moveto
38 139 56 239 286 209 curveto
286 215 31 192 16 69 curveto
closepath
fill
%% Finally use show page to complete the current page
showpage
With using PS file to PDF is much much easier than any other method I tried, but the postscript actually has a lot move comments then I mentioned. I am still trying to gather more information and post it to this blog. any comment, please post it here for me.
Tuesday, July 24, 2012
Thursday, September 29, 2011
Check and optionally end a process
Method 1
In the Main program of the project, this method check the executable program name in the window process.
LPARAMETERS xExe, xTerminate
Private xLocator, xWMI, xProcesses, xProcess, xIsRunning
xLocator = CREATEOBJECT('WBEMScripting.SWBEMLocator')
xWMI = xLocator.ConnectServer()
xWMI.Security_.ImpersonationLevel = 3
xProcesses = xWMI.ExecQuery([SELECT * FROM Win32_Process WHERE Name = '] + xExe + ['])
xIsRunning = .F.
if xProcesses.Count > 0
For EACH xProcess IN xProcesses
xIsRunning = .T.
if xTerminate
xProcess.Terminate(0)
ENDIF
NEXT
ENDIF
Return xIsRunning
Method 2
In the Main program of the project, this method checks the title of the window instead of the process name.
Private xHandle, xTitle
Application.Visible = .F.
Set Exclusive ON
Declare Integer FindWindow In Win32API String, String
Declare Integer IsIconic In Win32API Integer
Declare Integer ShowWindow In user32 Integer, Integer
Declare SetForegroundWindow IN WIN32API Integer
xTitle = 'Home Budget'
xHandle = FindWindow(null, xTitle)
if xHandle <> 0
if IsIconic (xHandle) = 1
ShowWindow(xHandle, 4)
ELSE
DO FORM main
ENDIF
SetForegroundWindow(xHandle)
ELSE
OPEN DATABASE Budget
DO FORM MAIN
Read Events
ENDIF
Wednesday, September 14, 2011
Replacing 1999 Toyota 4Runner Spark Plug
For every 50,000 km. The spark plug should be replaced. To replace the spark plug for a 1999 4Runner is relatively easy provided that you know the procedure. Before you start popping up the hood, you should have the following item handy:
 1. Popup the hood, you should be able to see the engine compartment like this. It is a Toyota 1999 4Runner 5VZ-FE 3.4L 6 cylinder engine.
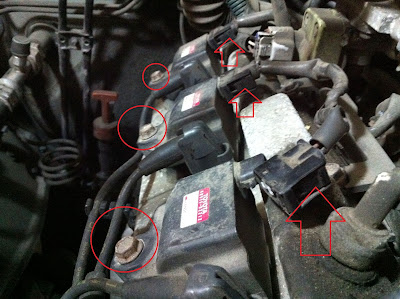
 2. Start removing the spark plug from the passenger side. Remove the hoses, clips and screws from the following circled locations. You can remove all hold air intake including the air filter but I don't recommend it because you will need to disconnect the MAF sensor. if you damage the MAF, it will be an expensive repairing. So don't touch that part. Also don't touch the MAF sensor. it is too easy to be broken.


 4. After the air intake is removed, you should be able access to 3 left side spark plugs. Just make sure do not get any dirt into the engine air intake.
 5. Press the tab and remove the connector, also remove all 3 screws to get access to the spark plugs.
 6. Now you can see the spark plug. Use the air compressor to blow all dirt out of the hole. If it is not clean enough, use a wire brush to clean it and spray it again.
 7. Now you can remove the spark plug. Just make sure to use a regular wrench to remove the plug. Never use torque wrench to remove anything.
 8. This is a stock spark plug from Toyota. As you can see, it is a twin ground spark plug from Denso, The model number is K16TR11. The old one is pretty dark but the new one should be in sparkling silver.
Before you install the new plug, put a little bit of anti-seize on the thread. Too much anti-seize is not necessary and not recommended.
 9. This time you have to use a torque wrench to tighten the plug. First, gently drop the plug in the hole. and just use the extension and spark plug socket without the wrench. Hand tighten the plug lightly. Do not force the turn hardly. if you damage the thread, you will need to paid for an expensive repairing job. Hand tighten until you cannot turn the plug anymore. then connect the extension bar to the torque wrench at 18nm. Tighten it until you hear the click sound.
 10. Before you reconnect the cable, put some dielectric first. It will make a better contact for the plug and cable. And it will make you a bit easier to remove the cable when the next time you have to replace the plug.
Repeat the step 5 to 10 for all 3 spark plugs. Then you can reinstall the air intake system. Make sure to reconnect all hoses. And secure all cable and hoses.
 11. To remove the driver side is not too hard except the last one plug against the firewall. But still not too hard provided that you have a pier.
First, remove the cable holder for the spark plug cable. then remove the diagnostic connector by press the tab at the back.
 12. Remove this nut. Make sure do not drop the screw or it is too hard to find it again.
 13. Remove the cable from the holder. And remove the holder. And remove the screws from the circled locations. If these screw is rusted, spray some penetrating oil. Then wait for a couple of minutes and try again.
 14. Now you can pull the cable to get access the first plug. remove the circled cable then you can get access to the second cable. if it is too hard to be remove. use a pier.
DO NOT PULL THE CABLE. You must pull the boot directly.
Repeat the same procedure to clean the hole, remove the replace the spark plug.
 15. Pull the bar to the left then you can get access to the final plug.
When all plugs are replaced. Reverse the procedure to reconnect all nuts, screws, cable.
DOUBLE CHECK ALL INSTALLATION BEFORE YOU START THE ENGINE.
My work has been done perfectly. Now the engine is running a lot quietly and smoother. Don't know the mileage improvement yet but I would say it will be a improvement for sure.
Any question. Please leave the comment.
- 6 new spark plugs. According to the Toyota's owner manual, double ground spark plug should be used. But in the NGK website mentioned a single ground is ok. That's all depends on your preference. I would recommend you to follow the Toyota's instruction.
- 3/8" wrench, 3/8" Torque wrench. The regular wrench is mainly for you to loosen the spark plug and other screws. Do not use the torque wrench for any loosen job as torque wrench is only designed for tightening. TEST YOUR TORQUE WRENCH BEFORE TIGHTEN ANY PLUG.
- 10" wrench extension is a must or you can't even get access to the spark plug. 10" is a good length for the job but longer is better.
- Spark plug socket is not the same as a regular socket. It is deeper, and it has a rubber boot inside of the socket, which is used to hold the spark plug.
- 10mm and 12mm sockets, Philips screw.
- Dielectric, Anti-seize, Penetration oil.
REMEMBER POWER TOOLS IS USEFUL BUT NOT FOR THIS JOB.
 1. Popup the hood, you should be able to see the engine compartment like this. It is a Toyota 1999 4Runner 5VZ-FE 3.4L 6 cylinder engine.
  2. Start removing the spark plug from the passenger side. Remove the hoses, clips and screws from the following circled locations. You can remove all hold air intake including the air filter but I don't recommend it because you will need to disconnect the MAF sensor. if you damage the MAF, it will be an expensive repairing. So don't touch that part. Also don't touch the MAF sensor. it is too easy to be broken.
3. Press the rubber tube and push it toward to the right to remove the air intake.


 4. After the air intake is removed, you should be able access to 3 left side spark plugs. Just make sure do not get any dirt into the engine air intake.

 7. Now you can remove the spark plug. Just make sure to use a regular wrench to remove the plug. Never use torque wrench to remove anything.
Before you install the new plug, put a little bit of anti-seize on the thread. Too much anti-seize is not necessary and not recommended.


Repeat the step 5 to 10 for all 3 spark plugs. Then you can reinstall the air intake system. Make sure to reconnect all hoses. And secure all cable and hoses.

First, remove the cable holder for the spark plug cable. then remove the diagnostic connector by press the tab at the back.


DO NOT PULL THE CABLE. You must pull the boot directly.
Repeat the same procedure to clean the hole, remove the replace the spark plug.

When all plugs are replaced. Reverse the procedure to reconnect all nuts, screws, cable.
DOUBLE CHECK ALL INSTALLATION BEFORE YOU START THE ENGINE.
My work has been done perfectly. Now the engine is running a lot quietly and smoother. Don't know the mileage improvement yet but I would say it will be a improvement for sure.
Any question. Please leave the comment.
Wednesday, August 17, 2011
Install Mac OSX 10.5.8 on Aspire One A150
Software
You might need to search and download the following software from the internet. Some of them can be downloaded directly from Apple.
- Kalyway 10.5.2 Installation disc burned on a DVD.
- 1_Kalyway_UpdCombo10.5.3.pkg
- 2_kalyway_10.5.3_kernel.pkg
- MacOSXUpd10.5.4.dmg
- MacOSXUpd10.5.5.dmg
- paulswinddriverutilitypack
- alc268fix
- Trackpad PreferencePane
Hard Drive Preparation
To install the MacOSX into an AspireOne netbook, the hard drive must be pre-formatted as a Mac extended partition. FAT32 or NTFS wont' work for Mac.
- Connect the external DVD drive.
- Boot up the computer.
- Press F12 to the boot sequence menu.
- Insert the Kalyway 10.5.2 disc into the drive.
- Wait until the disc is stop spinning.
- Select the DVD drive as the boot up disk.
- Wait until the language selection screen shows up. Then select English.
- In the welcome screen, DO NOT click continue.
- Click Utilities on the menu bar, then click Disk Utility.
- Select the main hard drive in the left pane.
- Select partition on the right pane, then select the disk0s1. DO NOT select disk0s0 or you can't restore the Windows XP.
- Erase the partition with "Mac OS extended journal"
- Enter the drive name. For example, MacintoshHD.
- Click Apply to erase the partition. It should take less than one minute.
- Click Quit Disk Utility from the Disk Utility menu.
- Now you can click continue to go ahead for the installation process.
Kalyway 10.5.2 installation
Setting up a Hacintosh is not quite straight forward. Lots of things has to be done carefully.
- Click Agree in the welcome screen
- Select the drive you just prepared, then click continue.
- In the big X screen. DO NOT click continue at this moment.
- Click customize and select the following option:
- Uncheck language translation
- Expand Kernel and ONLY seldct the kernel_9.2speedstep
- Expand graphic drivers and ONLY select the Intel_GMA950.
- Uncheck Audio Driver
- Expand Network Drivers, ONLY select RTL1000.
- If you have Broadcom card installed, also select the IO80211 family.
- Uncheck Mobo_chipsets
- Uncheck Thirds_application
- Uncheck patches
- Double check all options.
- Click Done and Install.
- When the installation process starts, click Skip to bypass the DVD Check process.
- The intallation takes about 30 to 40 minutes.
- Restart the computer when the installation is complete.
- First time boot up with Mac OS, you need to answer all the questions. Just do it.
- The first app loaded into the system is call Finder. Look at the top left corner besides the Apple logo to verify it.
- Close all opened windows.
Kalyway 10.5.3 installation
Change the kernel to Vanilla kernel in order to make the computer compatible to original Apple Update.
- Click Go, Utilities from the top menu.
- Double click terminal.
- Type "sudo su -"
- Type your password
- Type "vi /Library/Prefetences/SystemConfiguration/com.apple.Boot.plist"
- Move the current in between under the kernel_flags
- Type "I" switch to insert mode
- Type "cpus=1"
- Press Escape and type ":wq" to save the file.
- Close the terminal window by click the red button at the top left corner.
- Run the "Kalyway Mac OS X 10.5.3 combo update.pkg". After the process, DO NOT restart the computer.
- Run the "Kalyway_10.5.3_kernel.pkg". Go through the steps then select the "vanilla_kernel_9.3".
- When the installation is finished, close the window and click restart from the previous installation screen.
- When the computer is booting up, press spacebar or F8 to interrupt the startup.
- Type "update -v" then press enter.
- Lots of text will shows up on screen and that's normal even you see something has failed to load.
Kalyway 10.5.4 installation
Going a bit forward to 10.5.4.
- When you are in the Mac OS again, open the terminal again.
- Type "sudo su -" then press Enter.
- Type "while sleep 1 ; do rm -rf /System/Library/Extensions/AppleIntelCPUPowerManagement.kext ; done"
- Press Enter. Leave the window open for now.
- Mount the MacOSXUpd10.5.4.dmg then run the installation for 10.5.4.
- When the installation is finished, switch to terminal windows and press ctrl-c and close the window.
- Reboot your computer now.
- When the computer is booting up, press spacebar or F8 to interrupt the startup.
- Type "update -v" then press enter.
- Lots of text will shows up on screen and that's normal even you see something has failed to load.
Kalyway 10.5.5 installation
Going a bit more forward to 10.5.5
- When you are in the Mac OS again, open the terminal again.
- Type "sudo su -" then press Enter.
- Type "while sleep 1 ; do rm -rf /System/Library/Extensions/AppleIntelCPUPowerManagement.kext ; done"
- Press Enter. Leave the window open for now.
- Mount the MacOSXUpd10.5.5.dmg then run the installation for 10.5.5.
- When the installation is finished, switch to terminal windows and press ctrl-c and close the window.
- Reboot your computer now.
- This time the computer might take 5 minutes to boot or will never boot. If you wait longer than 10 minutes, just press the power button to restart it.
- When the computer is booting up, press spacebar or F8 to interrupt the startup.
- Type "update -v" then press enter.
- Lots of text will shows up on screen and that's normal even you see something has failed to load.
Sound work
Make your computer sing by doing this steps
- In the "Paul's wind driver &utility pack", go into the "sound" folder.
- Double click "AzaleaAudio.pkg" and step through the installation.
- Restart the computer.
- When the computer is back to OSX, go to the ALC268Fix folder.
- Run the ALC268_Installer1. DO NOT restart the computer when it is finished.
- Goto the /System/Library/Extensions. Move the ALCInject.kext to the trash.
- And you can restart your computer now.
- In the "Paul's wind driver &utility pack", go into the "utilities" folder.
- Double click the "kext helper b7".
- Use the finder to open the ALC268Fix folder.
- Drag and drop the HDAEnabler.kext to the kext helper.
- Type in your password and click "Easy install".
- When it is finished, DO NOT restart the computer.
- Run the "Disk Utility".
- Select the MacintishHD partition in the left pane.
- Select the first-aid tab in the right pane.
- Click "repair permissions". It takes a while.
- Restart your computer when the repairing is done.
- When you are in the OSX again, goto the "System preference" and click "sound".
- Select the internal speaker in the play alert and sound effects tabs.
Resolution fix #1
Utilize the natural LCD resolution, 1024x600.
- In the "Paul's wind driver &utility pack", go into the "utilities" folder.
- Double click the "kext helper b7".
- Use the finder to open the "kext" folder in the Paul's pack.
- Drag and drop the following kext to the kext helper.:
- AppleIntelGMA950.kext
- AppleIntelIntegratedFrameBuffer.kext
- AppleSMBIOS.kext
- ClamshellDisplay.kext
- Natit.kext
- Type in your password and click "Easy install".
- When it is finished, DO NOT restart the computer.
- Run the "Disk Utility".
- Select the MacintishHD partition in the left pane.
- Select the first-aid tab in the right pane.
- Click "repair permissions". It takes a while.
- Restart your computer when the repairing is done.
- When you are in the OSX again. The resolution should be in 1024x600 now.
IDeneb 10.5.8 Installation
Finally upgrade the MacOS to the latest Leopard version, 10.5.8. This version will let your computer work with the lastest xCode for Leopard. And also let your computer work with iPhone4 and iOS 4 device.
- Open the terminal from utility menu.
- Type "sudo su -" then press Enter.
- Type "while sleep 1 ; do rm -rf /System/Library/Extensions/AppleIntelCPUPowerManagement.kext ; done".
- Press Enter and leave the window open for now.
- Double click the iDeneb.MacOSx86ComboUpd10.5.8.pkg
- Step through the installation process.
- When the installation is finished, switch to terminal windows and press ctrl-c and close the window.
- Reboot your computer now. This time the computer might take 5 minutes to boot. Or it be rebooted a couple of time.
Resolution fix #2
I like to use the 1024x600 natural LCD resolution. So I did these steps again. But make sure do not reload the AppleIntelGMA950.kext or your screen will become grey with some black line, that's no good.
- After the computer is booted back to OSX. You will notice the resolution is in 800x600 again.
- So now you need the kext helper again by drag and drop the following kext to the kext helper.:
- AppleIntelIntegratedFrameBuffer.kext
- AppleSMBIOS.kext
- ClamshellDisplay.kext
- Natit.kext
- You should notice the AppleIntelGMA950.kext hasn't been select. That's correct. DO NOT select this file.
- Type in your password and click "Easy install".
- When it is finished, DO NOT restart the computer.
- Run the "Disk Utility".
- Select the MacintishHD partition in the left pane.
- Select the first-aid tab in the right pane.
- Click "repair permissions". It takes a while.
- Restart your computer when the repairing is done.
- When you are in the OSX again. The resolution should be in 1024x600 again.
Trackpad fix
When your mouse is not with you, Trackpad is the only thing you have to control the cursor. You will want to have a little bit control on this device.
- Go to the /System/Library/PreferencePanes folder
- Move the Trackpad.prefPane to the Trash
- Copy the new Trackpad.prefPane from the trackpad fix pack to the /System/Library/PreferencePanes.
- You should see the Trackpad icon in the System Preference menu.
Software Update
Now you can do the software update from Apple, but I will only select the Safari, iTunes and Quick Time update. Because I had experienced the crash or kernel panic from some update. Or it makes the Airport Card stop working.
Sunday, August 7, 2011
Macro lens photo

Canon 60D. 55mm, f/22, with EF12, focus at 4 inches.
This is my testing macro photo. I used my pretty old lens on the 60D. The actual size of this car is 1:43. The background is a magazine. And the ground is a bible. I put a desktop light on top of the object. Also used an EF12 extension tube to reduce the focal length from 1.1 ft down to 4 inches. The aperture must be opened as wide as possible, or the field of depth will be extremely shallow. Of course, Camera on tripod is a must. I don't have shutter cable or remote yet, so I just simply use 2 seconds self timer to solve the shaking from pressing shutter. It works for me.
Thursday, July 28, 2011
Use Foxpro to work with Excel
** Opening ******************************************
*
_xls.CreateObject ('Excel.Application')
_xls.Workbooks.Add
_xls.Workbooks.Open (sys(5) + curdir() + 'book.xls')
_xls.Visible = .t.
** Sheets *******************************************
*
_xls.sheets(1).Select && Select Sheet
_xls.sheets(2).Delete && Delete Sheet
_xls.sheets(3).Name = 'Hello' && Rename Sheet
_xls.sheets.add && Add new sheet
** Columns / Row ************************************
*
_xls.Rows("1:5").RowHeight = 10
_xls.Rows("1:5").EntireRow.AutoFit
_xls.Rows("1:5").Insert
_xls.Columns("A:Z").ColumnWidth = 10
_xls.Columns("A:Z").EntireColumn.AutoFit
_xls.Columns("A:B").Insert
** Selection ****************************************
*
_xls.Range("A1:A5").Select && Select Range
_xls.Cells(1, 1).Select && Select Cell
_xls.Selection.End(1).Select && Next Left
_xls.Selection.End(2).Select && Next Right
_xls.Selection.End(3).Select && Next Top
_xls.Selection.End(4).Select && Next Bottom
_xls.Columns("A:Z").Select && Select Columns
_xls.Rows("1:5").Select && Select Rows
_xls.Cells.Select && Select Entire Workbook
** Data Extract / Assignment ************************
*
_xls.Selection = 'Text'
_xls.Cells(1, 1).Value = 'Text'
_value = _xls.Cells(1, 1).Value
** Font Style Setting *******************************
*
_xls.Selection.Font.Name = 'Arial'
_xls.Selection.Font.Size = 12
_xls.Selection.Font.Bold = .T.
_xls.Selection.Font.Italic = .T.
_xls.Selection.Font.Underline = .T.
_xls.Selection.Font.ColorIndex = 0
_xls.Selection.ShrinkToFit = .T.
_xls.Selection.Orientation = 45
_xls.Selection.MergeCells = .T.
_xls.Selection.WrapText = .T.
_xls.Selection.NumberFormat = '$#,##0.00'
_xls.Selection.Interior.ColorIndex = 0
** Alignment ****************************************
*
_xls.Selection.HorizontalAlignment = 1 && Auto Justify
_xls.Selection.HorizontalAlignment = 2 && Left Justify
_xls.Selection.HorizontalAlignment = 3 && Center Justify
_xls.Selection.HorizontalAlignment = 4 && Right Justify
_xls.Selection.VerticalAlignment = -4160 && Top Justify
_xls.Selection.VerticalAlignment = 2 && Center Justify
_xls.Selection.VerticalAlignment = 3 && Bottom Justify
** Border Lines *************************************
*
_xls.Selection.Borders(1).LineStyle = 1 && Cell Left
_xls.Selection.Borders(2).LineStyle = 1 && Cell Right
_xls.Selection.Borders(3).LineStyle = 1 && Cell Top
_xls.Selection.Borders(4).LineStyle = 1 && Cell Bottom
_xls.Selection.Borders(5).LineStyle = 1 && \ Diagonal
_xls.Selection.Borders(6).LineStyle = 1 && / Diagonal
_xls.Selection.Borders(7).LineStyle = 1 && Outer Left
_xls.Selection.Borders(8).LineStyle = 1 && Outer Top
_xls.Selection.Borders(9).LineStyle = 1 && Outer Bottom
_xls.Selection.Borders(10).LineStyle = 1 && Outer Right
_xls.Selection.Borders(10).Weight = 1 && See line weight below
** Picture ******************************************
*
_xls.ActiveSheet.Pictures.Insert ( ;
sys(5) + curdir() + 'TEST.JPG').Select
_xls.Selection.ShapeRange.ScaleHeight(0.5, 1, 0) && 0.5=50%
_xls.Selection.ShapeRange.ScaleWidth (0.5, 1, 0)
_xls.Selection.ShapeRange.IncrementLeft (1) && Minus to move right
_xls.Selection.ShapeRange.IncrementTop (1) && Minus to move up
_xls.ActiveSheet.Shapes.Addline (X1, Y1, X2, Y2).Select
** Page Break ***************************************
*
_xls.ActiveSheet.Rows(10).PageBreak = 1 && 0 = Remove Break
_xls.ActiveSheet.Columns(10).PageBreak = 1
** Page Setup ***************************************
*
_xls.ActiveSheet.PageSetup.CenterHeader = "Center Header"
_xls.ActiveSheet.PageSetup.LeftHeader = "Left Header"
_xls.ActiveSheet.PageSetup.RightHeader = "Right Header"
_xls.ActiveSheet.PageSetup.CenterFooter = "Center Footer"
_xls.ActiveSheet.PageSetup.LeftFooter = "Left Footer"
_xls.ActiveSheet.PageSetup.RightFooter = "Right Footer"
_xls.ActiveSheet.PageSetup.HeaderMargin = 36 && 1" = 72
_xls.ActiveSheet.PageSetup.FooterMargin = 36
_xls.ActiveSheet.PageSetup.BottomMargin = 36
_xls.ActiveSheet.PageSetup.TopMargin = 36
_xls.ActiveSheet.PageSetup.LeftMargin = 36
_xls.ActiveSheet.PageSetup.RightMargin = 36
_xls.ActiveSheet.PageSetup.PrintArea = "A1:Z30"
_xls.ActiveSheet.PageSetup.PrintGridLines = .T.
_xls.ActiveSheet.PageSetup.PrintHeading = .T.
_xls.ActiveSheet.PageSetup.PrintTitleColumns = "$A:$B"
_xls.ActiveSheet.PageSetup.PrintTitleRows = "$1:$5"
_xls.ActiveSheet.PageSetup.FitToPagesWide = 1
_xls.ActiveSheet.PageSetup.FitToPagesTall = 1
_xls.ActiveSheet.PageSetup.Zoom = .F.
_xls.ActiveSheet.PageSetup.CenterHorizontally = .T.
_xls.ActiveSheet.PageSetup.CenterVertically = .T.
_xls.ActiveSheet.PageSetup.PaperSize = 1 && 1=Letter, 2=Legal
_xls.ActiveSheet.PageSetup.Orientation = 1 && 1=Portrait
&& 2=Landscape
** Closing ******************************************
*
_xls.DisplayAlerts = .F.
_xls.AlertBeforeOverwriting = .F.
_xls.ActiveWorkBook.Save
_xls.ActiveWorkBook.SaveAs (sys(5) + curdir() + 'book.xls')
_xls.Quit
Release _xls
***** Color Index *****
*
* 00=No Fill 01=Black 02=White 03=Red
* 04=Bright Green 05=Blue 06=Yellow 07=Pink
* 08=Turquoise 09=Dark Red 10=Green 11=Dark Blue
* 12=Dark Yellow 13=Violet 14=Teal 15=Gray 25%
* 16=Gray 50% 33 Sky Blue 34=Light Turqupise 35 Light Green
* 36=Light Yellow 37=Pale Blue 38=Rose 39=Lavender
* 40=Tan 41=Light Blue 42=Aqua 43=Lime
* 44=Gold 45=Light Orange 46=Orange 47=Blue-Gray
* 48=Gray 40% 49=Dark Teal 50=Sea Green 51=Dark Green
* 52=Oliver Green 53=Brown 54=Plum 55=Indigo
* 56=Gray 80%
*
***********************
***** Line Style ******
*
* 1=Continuous 4=Dash Dot 5=Dash Dot Dot 13=Slant Dash Dot
* -4115=Dash -4118=Dot -4119=Double
*
***********************
***** Line Weight *****
*
* 0=None 1=Hairline 2=Thin -4138=Medium 4=Thick
*
***********************
Subscribe to:
Posts (Atom)